第一步:
首先你必須清楚知道你要為角色加上什么樣的頭發(fā)����,否則你會(huì)發(fā)現(xiàn)怎樣調(diào)你都不會(huì)滿意。
1����、選擇頭的模型執(zhí)行modify->make live。
2���、執(zhí)行create->CV curve tool開(kāi)始畫(huà)前額線���,如圖1。這條線決定頭發(fā)的分線����。

3、執(zhí)行edit curves->rebuild curve以u(píng)niform形態(tài)重建線為9spans����,degree 3并顯現(xiàn)curve的cv點(diǎn)���。
4、將此線的名稱改為hair_split_curve01
5�����、復(fù)制hair_split_curve01曲線并將復(fù)制的線稍微向旁邊移動(dòng)���。
6�、將復(fù)制的名稱改為hair_split_curve02���。
7�����、畫(huà)上一條曲線����,將hair_split_curve01及hair_split_curve02連接起來(lái)
8�����、將這3條線向下移動(dòng)并縮小一點(diǎn)���,讓他們?cè)陬^皮下面�。

第二步:
接下來(lái),我們要畫(huà)一些曲線來(lái)決定頭發(fā)的走向
1����、選擇頭執(zhí)行make live,并選擇CV curve tool將第一個(gè)點(diǎn)和hair_split_curve01的第一個(gè)點(diǎn)連接起來(lái)�,然后在頭的左邊畫(huà)4到6個(gè)點(diǎn)(cv點(diǎn)的數(shù)目越少越好�����,但是仍然要有足夠數(shù)目去創(chuàng)造你要的形狀)
2���、依照上述方法繼續(xù)畫(huà)其他的線����。
3����、選擇第一條控制曲線并移動(dòng)cv點(diǎn),開(kāi)始調(diào)整你要的形狀(這里應(yīng)該要先duplicate surface curves才對(duì))
4�、調(diào)整好之后將這些控制線group起來(lái),并復(fù)制出另一邊的控制線(稍微調(diào)整���,讓兩邊看起來(lái)有些不同)
5�����、現(xiàn)在以同樣的方法去畫(huà)留海的曲線����,如圖。

制作如圖����。

第三步:
現(xiàn)在要畫(huà)上頭發(fā)
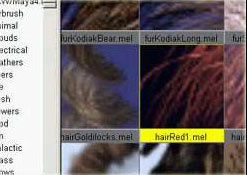
1、到visor視窗并打改hair的比稍檔案夾�����,選擇hairred1.mel(依個(gè)人需求可選不同的筆刷)
2�����、選擇hair_split_curve01執(zhí)行painteffects->attace brush to curves
3���、重新將新的stroke命名為hair_side_stroke01其筆刷名稱改為hair_side_brush
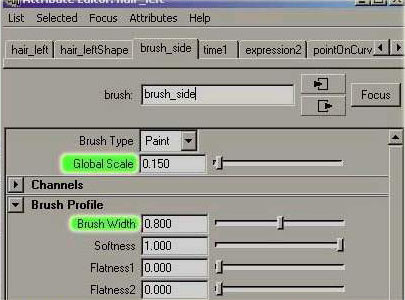
4�����、現(xiàn)在要調(diào)整頭發(fā)的大小�����,選擇hair_side_stroke01進(jìn)入attribute edit調(diào)整global scale為0.150(依照個(gè)人模型大小做適當(dāng)?shù)恼{(diào)整)
5�����、打開(kāi)brush profiles項(xiàng)���,并調(diào)整brush width為0.8(依照個(gè)人模型大小做適當(dāng)?shù)恼{(diào)整)不要調(diào)整得太低,不然頭發(fā)看起來(lái)會(huì)不平�����。
6����、現(xiàn)在選擇hair_side_stroke01并按shift選擇其他和hair_side_stroke01同一邊的控制線(選左半部或右半部其中一邊的線就行,不用全選���。)
7�、執(zhí)行paint effects->curve utilities->set stroke control curves(只調(diào)整一條線就會(huì)同時(shí)調(diào)整所有的線)
8�、到hair_side_brush的屬性編輯器里的tubes behaviorlforces項(xiàng)下修改curvefollow=1(控制頭發(fā)順著控制線的服貼度)set length flex=1(讓頭發(fā)長(zhǎng)度和控制線一樣長(zhǎng))
9����、hair_side_stroke01的屬性編輯器改display quality(控制頭發(fā)數(shù)目密度)為10
10���、背景設(shè)置為白色�����,測(cè)試算圓�����。

第四步:
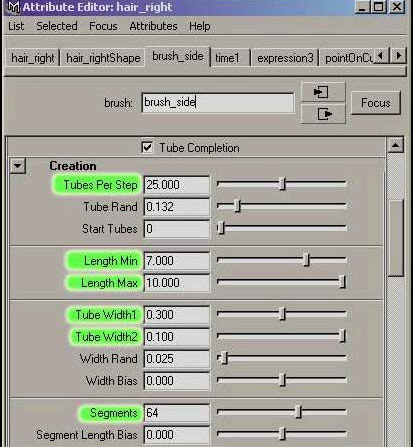
1����、調(diào)整hair_side_brush屬性編輯器下tubeslcreation的tubes per step為25(控制頭發(fā)密度)
2���、調(diào)整length min=7及l(fā)ength max=10(控制長(zhǎng)度)
3�����、調(diào)整tube width1=0.3及tube width2=0.1 with2控制頭發(fā)末端�。
4、調(diào)整segment=64控制頭發(fā)render出來(lái)的柔順度�。
5、調(diào)整simplify method 為tubes per step�����。
6�、測(cè)試算圓。
第五步:
1�、打開(kāi)hai_side_brush屬性編輯器下shadingltube shading改變color1(控制頭發(fā)顏色)及color2(控制發(fā)尾顏色)調(diào)整transparency1為黑色transparency2為灰色tip fade=0.2。
2�、現(xiàn)在要進(jìn)行貼圖,打開(kāi)shadingltubes shadingltexturing選擇map color調(diào)整texure type=file�����,map method=tube3D Tex Color1及TexColor2設(shè)置為白色���,從image name選擇所要的貼圖(注:筆者的貼圖是用相同的hairred1.mel筆刷畫(huà)在canvas上畫(huà)一垂直線,并在photoshop中縮放及作潤(rùn)色)�。
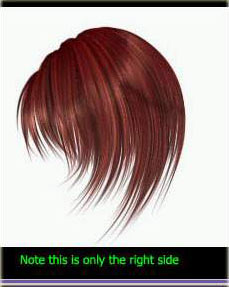
如圖。

第六步:
現(xiàn)在你必須將筆刷執(zhí)行到其他還沒(méi)有頭發(fā)的線上�。
1、選擇hair_split_curve02執(zhí)行painteffects->curve utilities->attach brush to strokes�����。
2、選擇新的stroke并shift選擇其他同一邊的曲線���。執(zhí)行painteffects->curve utilities->set stroke control curves���。
3、選擇的stroke 并選擇hair_side_stroke01執(zhí)行painteffects->share one brush(讓你只要調(diào)整hair_side_stroke01的屬性就會(huì)影響新的那條stroke)�。
4、選擇留海的曲線執(zhí)行attace brush to strokes 及stroke control curves�����。
5�、命名為hair_front_stroke。
6�����、選擇hair_side_stroke01執(zhí)行painteffects->get setting from selected stroke�����。
7����、選擇hair_front_stroke執(zhí)行painteffects->apply setting to selected strokes�����。

第七步:
現(xiàn)在前面的頭發(fā)看起來(lái)不太對(duì)而側(cè)邊的頭發(fā)厚度不夠����,因此還要再做一些調(diào)整���。

1����、選擇hair_front_brush打開(kāi)attribute editor 修改tubesperstep=10,segments=24,behaviorlforces curve attract=-0.041(讓頭發(fā)稍微散開(kāi))�����。
2����、選擇hair_side_brush curveattact設(shè)置為-0.050�����。
3、如要讓頭發(fā)看起來(lái)亂一點(diǎn)就再調(diào)seed value and tube rand values�。
我們都知道人的頭發(fā)厚薄不均勻,因?yàn)槲覀儠?huì)去剪頭發(fā)����,例如前額的頭發(fā)較薄后面的頭發(fā)較厚,或者側(cè)面的頭發(fā)會(huì)比后面的密集�����,這里我們要使用pressure curve去告訴paintfx哪些頭發(fā)要較密集�。
4、選擇hair_side_stroke01執(zhí)行painteffects->curve utilities->make pressure curves/option����,調(diào)整control points=10 offset scale=0.05執(zhí)行后會(huì)出現(xiàn)一條pressure curve,如果pressure curve離hair_side_stroke01太近你必須重新調(diào)整offset scale若要?jiǎng)h除則在stork屬性編輯器pressure mapping項(xiàng)下再pressuremin3上按右鍵選擇deldte expression。
5����、如果你滿意你的pressure curve 位置的話則打開(kāi)pressre mapping并設(shè)置pressre mapping1=tubes per step set pressure min1=0.1 pressure max1=1。
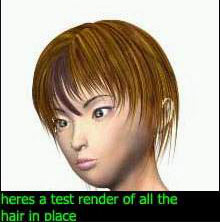

6�、關(guān)閉其也pressure mapping以免發(fā)生意外����,現(xiàn)在必須去調(diào)整pressure curve的CV點(diǎn)�����,并往上移動(dòng)中間的CV點(diǎn)����,使其比其他CV點(diǎn)的位置高,如果你沒(méi)看到頭發(fā)厚度有何改變則稍微調(diào)整一下pressure min1���。
7����、同時(shí)降低前后的CV點(diǎn)位置讓前面及后面頭發(fā)較薄��。
